GammaGuard Complete User Manual for BCIP Project
Executive Summary
Once GammaGuard is properly configured, basic operation is simple. The basic operation can be summarized as follows:
Using GammaGuard with Internal Sensor
1. Turn on the phone by holding down the PWR button on the upper right hand side.
2. Check battery level. A charger is available in the case.
3. Tap the GammaGuard icon to activate.
4. Select “Camera Detector” and “Measure”.
5. Explore the various screens and settings menu for options. The “Interpret” screen interprets the readings for you.
Using External Detectors in Stand-Alone Mode
1. Remove the selected external detector from the case.
2. Switch it ON by pressing the button for 3 seconds and then releasing. The battery level will be displayed.
3. Short press the button (~1s) to move between screens.
4. When finished, long press the button for 3 seconds and release to shut down. “Sleeping” will be displayed.
Using GammaGuard with External Detector
1. Switch external detector on, as described above.
2. Turn on phone and start GammaGuard, as described above.
3. Select “External Detector”
4. The phone will list the external detectors that are available. Select your detector.
5. Explore the various screens and settings menu for options. The “Interpret” screen interprets the readings for you.
GammaGuard is also a powerful tool with many options. Some of these options are password protected and intended for experts, performing the initial configuration. Other options are available to the user and are not password protected.
The optional functionality is described in the rest of this manual. A field user only needs to know the simple procedure above.
Table Of Contents
Using GammaGuard with Internal (Camera) Sensor
Measurement of Radiation Level
Continuous Measurement of Radiation Level
Optimize your phone's performance
Using External Detectors in Stand-Alone Mode
Detailed Detector Descriptions
CT007-S & CT007-EC GM tube based survey meters
CT007-S/EC Low Battery Indicator
CT007-S/EC High Dose Rate Alarm
AM003 Charging and Full Charged Indicator
Using GammaGuard with External Detector
Enable Displaying All Bluetooth Devices
Measurement of Radiation Level
Storing External Detectors in Memory
Removing or Changing Stored Detectors
External Detector Detailed View
External Detector Interpret View
Installation/Update Instructions
Using GammaGuard with Internal (Camera) Sensor
Note: Before starting any measurements, ensure the camera lens is covered by closing the shutter on your phone case. If you don’t have a shutter case, you can cover the camera lens on the back of your phone with a couple of strips of black electrical tape.
Do not uninstall GammaGuard unless absolutely necessary. This will clear all calibration and settings data, requiring noise removal and calibration on a check source before measurements will yield accurate results. App updates however will not result in any lost data.
1. Quick start
The Quick Start section is for quick and general use. More in depth operation is described in the rest of the manual.
a. Removing Camera Noise
If the app has not previously had the camera noise removed, this should be done before a set of measurements can be taken. Press the "Remove Camera Noise" button to start this process. For more information about removing noise see Removing Camera Noise section. This has already been done for all phones supplied for the BCIP project and you should not have to re-do this.
b. Measurement of Radiation Level
If you have a particular object that may be giving off radiation, face the rear camera (back of smartphone) toward that object and press measure. It takes a few seconds for the phone to start measuring, this is normal. The smartphone will display the dose rate (in uSv/h) averaged over a 2 minute interval. This implies that you have to wait 2 minutes in order to obtain an accurate dose rate reading. Note that at relatively low radiation levels (< 20 uSv/h) there will be considerable fluctuations in the displayed dose rate. This normal and is because of counting statistics.
You can stop, reset the counts, and re-measure again at any time.
c. Counts Tone
Each beep represents a count detected by the phone. You can disable this in the settings page. Registering only occasional, or sometimes no counts is normal. This just means you are in a low radiation environment.
d. Alarm
Your phone can be set to alarm if it detects a higher radiation level than the alarm threshold. The alarm is disabled by default. Users can enable the alarm and set their own thresholds as desired. The default threshold is set to engage the alarm when count rates over 50 counts per 1000 frames are registered. (This will be changed to uSv/h in the next revision.)
e. Reading Data
Measured count rates are displayed on your screen in units of uSv/h. You can save data to your phone memory if desired, see Data Logging in the Settings menu.
f. Stop measuring
Stop measuring by pressing "STOP" button.
g. Continuous Measurement of Radiation Level
You can measure the radiation levels continuously while using the phone for other purposes. See Background Mode. The phone will display the current radiation levels continuously in this mode.
h. Exit app
Exit the app by opening the navigation drawer (top left three line icon, or swipe in from left side of screen) and clicking the Close option. This will stop all radiation measurements and exit the app.
2. Removing Camera Noise
Note: All phones provided for the BCIP project have already had camera noise removed and a calibration factor entered. Instructions in this section should only be followed if you wish to re-do this process, or install GammaGuard on a new phone.
During the noise removing process, the app finds the brightness threshold and learns how to differentiate real radiation events from noise.
If your device has not previously had camera noise removed, the “Measure” button on the camera screens will be greyed out until you remove noise. Don’t press the measure button while removing noise. Your device is still removing noise if "Finding Noise Signature" is displaying on top of the screen. It will also show the noise threshold, which should be in the range of 14 – 60. If it is over 60 please use the Parameter Modes setting (see setting section for changing modes) and try noise removing again or contact us at admin@eic.nu.
Provided phones have had their threshold manually set to 50. We recommend using this value for Galaxy S5s.
Removing Camera Noise takes a few minutes, but once this is done, the parameters will be stored and you won’t have to repeat this step. You can re-run the noise removal at any time. For example, you may want to re-remove camera noise if you find that the app is detecting radiation, even when you are in a low radiation area.
a. Finding Conversion Factor
The default (nominal) Conversion Factor in the App is set so that 1 uSv/h is equal to 1 Count/1000 F. (See Conversion Factor in the settings page for more information). While this will provide an approximate conversion to uSv/h a more accurate calibration will require the exposure of the smartphone to a known radiation field as the conversion factor varies from phone to phone. In order to determine the conversion factor for a specific smartphone, expose GammaGuard to a known radiation level and record the dose rate in Cnts/1000 frames, either directly from the "Dose Rate" display, if you have a strong field, or by multiplying the "Total Cnts/Total Fr" by 1000. Then, divide that value by the known dose rate, in uSv/h. This value typically ranges from 0.3 to 3. You can get an estimate of this factor by measuring the radiation from an ordinary smoke detector: http://www.gammawatch.com/smokedetector.html
b. Optimize your phone's performance
You can improve the performance of your phone by finding the optimized configuration of your camera settings. To see the procedure and an example of how to find the optimized mode of your phone visit: https://docs.google.com/document/d/1xBzAfxvhNZ89R-SH-HGTHfY4OL6v0DXvdAcpG1VXZOs/pub
3. Authentication
Some actions in GammaGuard require user authentication. This prevents calibration factors from being changed accidentally or by unauthorized users. When this happens, you will be prompted to enter your password. After entering your password, your authentication status will be stored until GammaGuard is closed.
The default GammaGuard password is ‘1234’. This can be changed from the settings menu.
4. Alarms
GammaGuard has two ways of notifying the user when their dose rate is over pre-set thresholds.
a. Alarm
The primary alarm in GammaGuard will trigger a notification when it’s dose rate threshold has been exceeded. This will play an alarm siren (as long as the volume on your phone isn’t turned down), add an icon to the top of the screen, and leave a message in the notification drawer. This can be configured with the Alarm and Alarm Level settings.
b. Warning Level
As a visual cue, the top panel of GammaGuard will change color as the dose rate rises. At a low dose rate, the panel will be green. As it rises it will change to yellow, and then to red. The levels this changes at can be configured with the Yellow Warning Level and Red Warning Level settings.
5. App Screens
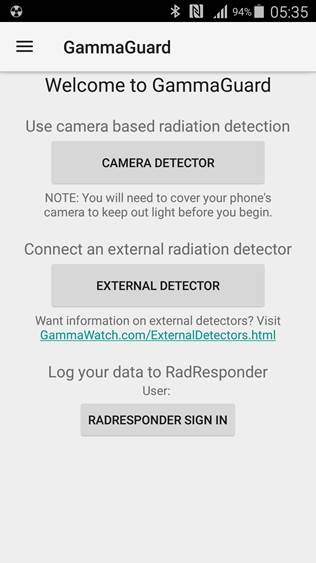
a. Home Screen
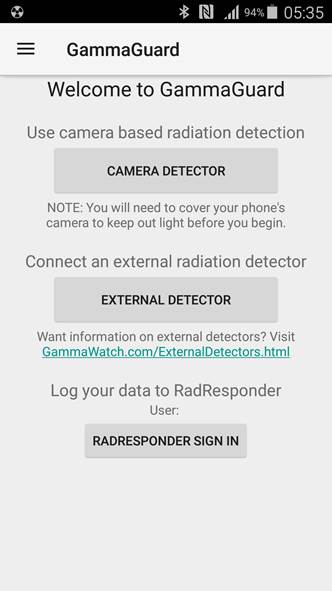
This is the screen you will see when first opening GammaGuard. From here you can go directly to either the camera detector or external detector. You can also sign in and out of RadResponder in order to have your data logged to your RadResponder account. To navigate through GammaGuard, you can open the navigation drawer by either clicking the three line icon on the top left, or by swiping in from the left of the screen
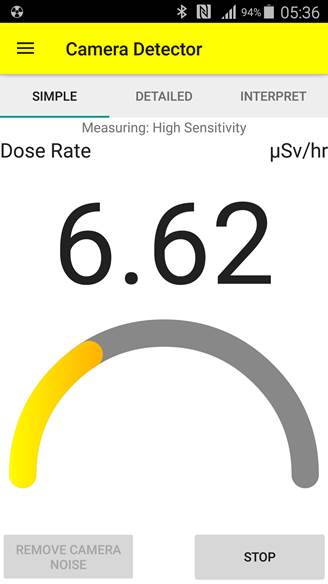
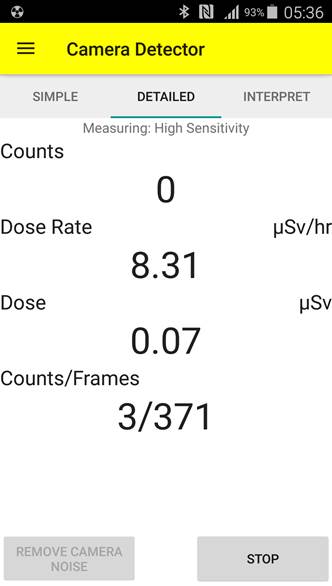
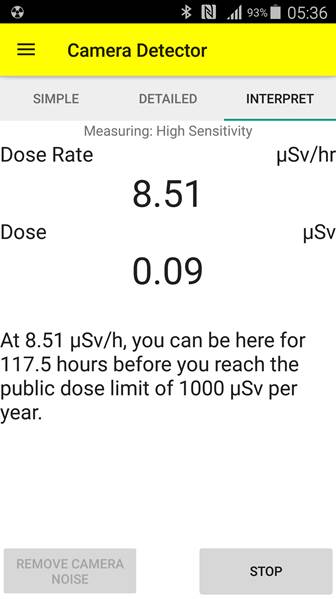
b. Camera Detector
The camera detector interface has three different views in order to see your data in different ways. You can change between these views by either swiping left and right, or by clicking on the tab of the view you want to see.
From each of these views you can Remove Camera Noise (necessary before beginning your first measurement) and start or stop camera measurements. They also all have the status displayed at the top. Possible statuses include:
● Idle:Power Save/Idle: High Sensitivity: Indicates the device is not actively detecting radiation (counting) or updating count values. Also shows which measurement mode (Power Save or High Sensitivity) is currently selected.
● Measuring: Power Save/Measuring: High Sensitivity: Indicates the device is measuring radiation and displaying counts on the home screen as radiation events are detected. Also shows which measurement mode (Power Save or High Sensitivity [Full Power]) is currently selected.
● Removing Camera Noise: Finding Noise signature: Device is currently removing camera noise and finding noise signatures of your phone.
i. Camera Simple View
This is the most basic data view. Only the dose rate is displayed, in a large enough font to be easily read at a distance.
ii. Camera Detailed View
This view gives the most detailed information. It shows the live counts as they come in, dose rate, total dose, and the total accumulated counts and frames.
iii. Camera Interpret View
This view interprets your current dose rate. Letting you know how many hours you can stay there before exceeding a limit.
6. Settings
The settings can be accessed at any time through the navigation drawer. The camera detector and the external detectors have separate settings. Make sure you select the settings specific to the camera detector.
Once you enter the settings menu, you will be prompted for a password. If the correct password is entered, all settings are displayed. If the wrong password is entered or if the user hits "Cancel" only the settings that do not require authentication are displayed.
a. Power Save
Enable power save mode to save battery life while the app is measuring. This limits the number of frames collected, reducing the amount of heat generated but also the sensitivity.
b. Sound
Toggle this setting to enable/disable beeps to notify when a count is detected.
c. Alarm
Toggle this setting to enable/disable alarm warnings.
d. Front Camera
Toggle this setting to enable/disable the front camera (disable/enable the rear camera) for measurements and camera noise removing. The front camera on some phones is very noisy. Using the back camera usually gives better results.
e. Camera Uncovered Warning
The app stops the measurements and warns the user if the camera is uncovered. Disable this if you don't want the app to warn you about the uncovered camera. If you are planning to expose GammaGuard to very high dose rates (e.g. hundreds of Gy per hour), you should disable the warning. At those dose rates, enough pixels get exposed to trigger the warning.
f. Alarm Level
This is the Dose rate level to be exceeded before an alarm is sounded. The alarm will sound even when the app is in the background.
g. Display Units
This changes the primary unit that doses and dose rates are displayed in.
h. Data Logging
When enabled, dose data is periodically logged to a file on the phone, as well as to RadResponder (or another WebBased database), if you are currently logged in.
i. Logging Interval
This is the interval (in seconds) at which data is logged.
j. RadResponder Event ID
This is the ID of the event from your RadResponder account that your data will be logged to. This will be set when you log on to your RadResponder account, but can also be manually changed here.
k. Background Mode
When enabled, this allows GammaGuard to run in the background so that radiation data can constantly be monitored. When disabled, GammaGuard will automatically close when it is interrupted (e.g. by receiving a phone call or another alert).
l. Yellow Warning Level
This sets the dose rate level at which the title bar will turn from green to yellow when a radiation measurement is in progress.
m. Red Warning Level
This sets the dose rate level at which the title bar will turn from yellow to red when a radiation measurement is in progress.
n. Conversion Factor
(Secure setting) This is the conversion factor used to convert counts/1000 frames to uSv/h. This is the value that should be changed when calibrating the phone on a check source. To see how to find a conversion factor for your phone, please see our look at our smoke detector example: http://www.gammawatch.com/smokedetector.html
o. Threshold
(Secure setting) This is the brightness level that a pixel must reach to be considered a count (0-255). This is set automatically when removing camera noise, but can be manually changed here.
p. Parameter Mode
(Secure setting) These are the different camera settings parameter modes that are available. If there are problems with measuring radiation on a phone, this setting should be changed. Parameters are ISO, Exposure-compensation, scene-mode, white balance, flash mode, focus mode, and anti-bonding. Modes:
i. Enable all parameters
ii. Enable all parameters except "scene mode"
iii. Enable all parameters except "scene mode" and "Exposure Compensation"
iv. Restore all parameters to the phones defaults.
Changing the parameter mode requires a complete re-calibration of GammaGuard.
q. Pixel Brightness Logging
(Secure setting) Enable or disable logging a histogram of the camera pixel brightness (0-255) for each frame while measuring. This will use a large amount of memory, and should only be enabled for debugging purposes.
r. Password
(Secure setting) This changes the password that you must enter to become authenticated.
Using External Detectors in Stand-Alone Mode
The external detectors of the GammaGuard Complete system are intended to be connected to the GammaGuard Complete app. This provides a rich user interface (UI) , which is almost identical to the UI for GammaGuard Complete with internal sensor. However, the external detectors also have some basic stand-alone functionality. This is described in this section.
Table 1 lists the the external detectors that have been supplied as part of the BCIP project.
Table 1 List of Detectors
|
Detector name |
Description |
|
CT007-S |
GM tube based survey meter |
|
CT007-EC |
Energy compensated GM tube based survey meter |
|
CT007-P |
Pancake Contamination Probe |
|
AM003 |
External Interface to 32 mm diameter x 49 mm NaI(Tl) Detector - or it can connect to any standard third party probe. |
The 4 detector systems listed in Table 1 are shown in Figure 1. the order (left to right CT007-S, CT007-P , CT007-EC, and AM003). These radiation detectors can be used as independent detectors or connected (via bluetooth) to the GammaGuard smartphone system. This User Manual addresses the use of the detectors as a stand-alone device, and secondly, as a detector system operating under the control of the GammaGuard app.
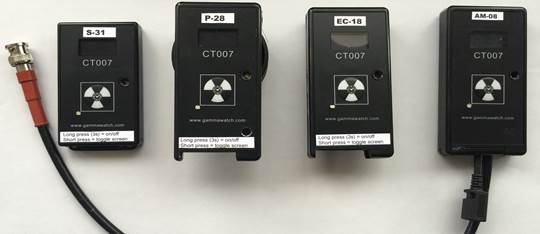
Figure 1 The EIC External Detectors in the Order CT007-S, CT007-P , CT007-EC, and AM003
The operation of these external detectors is quite similar for all four detectors.
Each detector has an OLED display, a control button, a buzzer, and a LED as shown in Figure 2.
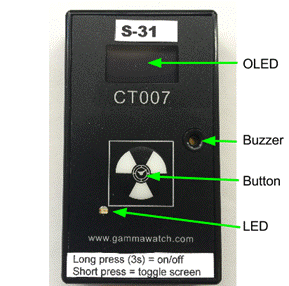
Figure 2 EIC External Detector Controls
Following the installation of batteries, (2 x AAA for CT007-S and 2 x AA for CT007-EC and P), the detector will be up in 7 seconds and the OLED will be displaying the first screen on each detector.
The Control Button is used to toggle between different screens on each device and is also to turn the device ON and OFF.
○ Short press (up to 2 Sec) : toggling between screens (tap the button)
○ Long press (2 - 9 Sec) : Turns detector ON and OFF (hold the button for at least two seconds, then release)
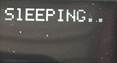
Power States
All External detectors have two power states, ON and OFF. To change power state, hold the button for at least two seconds, then release (Long press). Be sure to turn detectors OFF when not in use, to preserve battery power.
|
|
|
|
Turning OFF screen |
Turning ON screen |
|
Long button press when the device is ON, turns the device off |
Long button press when the device is OFF turns the detector ON |
Information Display
Tap the button (short press) to cycle through information displays. Each detector has its own information displays/Screen. These screens are described in the following section for each individual detector.
Detailed Detector Descriptions
a. CT007-S & CT007-EC GM tube based survey meters
The CT007-S is a small (5 cm x 9 cm x 1.5 cm) Geiger survey meter equipped with a LND 713 geiger tube. The CT007-S requires two AAA batteries to operate.
The CT007-EC is an energy compensated survey meter, equipped with a LND 71322 or LND 7149 geiger tube. (We are planning to go to the LND 7149 tube to improve robustness and achieve a higher measurement range.)
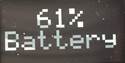
● CT007-S/EC Display
There are 4 screens that can be toggled by a short button press (Figure 3). A short button push after screen #4 will turn OFF the display.
Figure 3 CT007-S/EC Displays
|
|
|
|
|
|
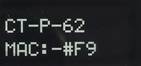
Screen #1 |
Screen #2 |
Screen #3 |
Screen #4 |
|
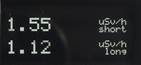
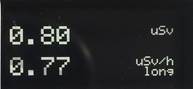
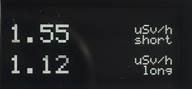
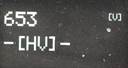
Total Dose [uSv/mSv]
(Long) Dose Rate (30sec avg) [uSv/h-mSv/h] |
(Short) Dose Rate (6sec avg) [uSv/h-mSv/h]
(Long) Dose Rate (30sec avg) [uSv/h-mSv/h] |
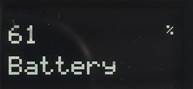
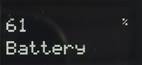
Battery Status in percentage |
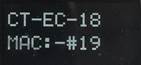
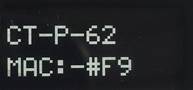
Name of the device
Last 2 digit MAC address |


● CT007-S/EC Low Battery Indicator
The detectors will beep every 10 seconds when the battery voltage is lower than 25%. The device automatically turns OFF at 0% battery power.
● CT007-S/EC High Dose Rate Alarm
If the alarm setting is enabled, the detector will beep every second if the dose rate exceeds the alarm setting. The alarm is disabled by default. To enable the Alarm, you must use the GammaGuard App. (See GamamGuard Setting Section)
b. CT007-P Contamination Meter
CT007-P is a small (5 cm x 10.5 cm x 3.5 cm) pancake contamination probe which can detect Alpha, Beta and Gamma radiation using a LND 7312 Geiger tube. The pancake probe is used to detect radioactive material deposited on surfaces. The CT007-P requires two AA batteries to operate.
● CT007-P Displays
There are 6 screens that can be toggled by short button press (Figure 4). A short button push after Screen #6 will turn the screen OFF.
Figure 4 CT007-P Displays
|
|
|
|
|
Screen #1 |
Screen #2 |
Screen #3 |
|
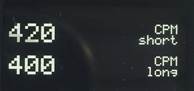
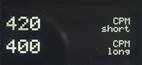
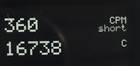
(Short) Count Rate (1sec avg) [CPM]
(Long) Count Rate (6sec avg) [CPM] |
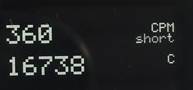
(Short) Count Rate (1sec avg) [CPM]
Total Counts [C or KC] |
Total Dose [uSv or mSv]
(Long) Dose Rate (6sec avg) [uSv/h or mSv/h] |
|
|
|
|
|
|
|
|
|
Screen #4 |
Screen #5 |
Screen #6 |
|
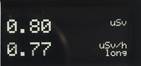
(Short) Dose Rate (1sec avg) [uSv/h or mSv/h]
(Long) Dose Rate (6sec avg) [uSv/h or mSv/h] |
Battery Status in percentage |
Name of the device
Last 2 digit MAC address |
● CT007-P Low Battery Indicator
The low battery alarm will be beep every 10 seconds when the battery voltage is lower than 25%. The device will turn OFF at 0% battery power
.
● CT007-P High Count Rate Alarm
If the alarm setting is enabled, the device will beep every second when the cpm rate exceeds a preset threshold. The alarm is disabled by default. To enable the Alarm, you must use the GammaGuard App. (See GammaGuard Setting Section)
c. AM003 External Probe
The AM003 accepts standard, third party external probes. For the BCIP project the AM003 device is equipped with a 32 mm diameter x 49 mm NaI(Tl) Detector. The AM003 uses a rechargeable Li-ion battery which can be charged by a usb cable.
● AM003 Displays
The AM003 has 7 Displays as shown in Figure 5.screens that can be toggled by short button press. The next screen after screen #7 is Screen OFF.
Screen #7 is shows the high voltage applied to the external detector probe. To change the high voltage, you must use the GammaGuard App. (See GammaGuard Setting Section)
Figure 5 AM003 Displays
|
|
|
|
|
|
Screen #1 |
Screen #2 |
Screen #3 |
Screen #4 |
|
(Short) Count Rate1sec avg)[CPM]
(Long) Count Rate (6sec avg)[CPM] |
(Short) Count Rate (1sec avg)[CPM]
Total Counts [C or KC] |
Total Dose [uSv or mSv]
(Long) Dose Rate (6sec avg) [uSv/h or mSv/h] |
(Short) Dose Rate (1sec avg) [uSv/h or mSv/h]
(Long) Dose Rate (6sec avg) [uSv/h or mSv/h] |
|
|
|
|
|
|
|
|
|
|
|
Screen #5 |
Screen #6 |
Screen #7 |
Screen OFF |
|
Battery Status in percentage |
Name of the device
Last 2 digit MAC address |
High Voltage [V] |
Screen will turn off with short button press after screen #7 |


● AM003 Low Battery Indicator
The low battery alarm will beep every 10 seconds when the battery voltage is lower than low battery threshold. Beeping means you should connect to a USB charger. The Device will turn OFF at 0% battery power. The AM003 can be used while connected to a charger.
● AM003 Charging and Full Charged Indicator
When a USB charger cable is plugged in, a green LED on the bottom-left side of the button will be blinking while the battery is charging. The LED will stop blinking and glows constant green when it's fully charged.
● AM003 High Count Rate Alarm
If the alarm setting is enabled, the device will beep every second when the cpm rate exceeds a preset threshold. The alarm is disabled by default. To enable the Alarm, you must use the GammaGuard App. (See GammaGuard Setting Section)
Using GammaGuard with External Detector
Do not uninstall GammaGuard unless absolutely necessary. This will clear all calibration and settings data. App updates however will not result in any lost data.
The external detectors of the GammaGuard Complete system can be used in stand-alone mode but are intended to be connected to the GammaGuard Complete app. This provides a rich user interface (UI) , which is almost identical to the UI for GammaGuard Complete with internal sensor. This is described in this section.
1. Quick start
The Quick Start section is for quick and general use. More in depth operation is described in the rest of the manual.
a. Enable Displaying All Bluetooth Devices
In order to initially connect to your detectors, go to settings and enable the Display All Bluetooth Devices option. You can disable this after you connect to each detector for the first time, then you only see your detectors while scanning. Up to four detector can be stored this way.
b. Connect to your Detector
Open the external detector page to scan for your detector (name/address) and tap to connect to it. The connection process may takes few seconds. After connection, you will be sent to the external detector home screen.
c. Measurement of Radiation Level
The first screen after connection is the dose rate registered from your detector. You can swipe between different screen to see more information (see the Home Screen section). You can also save data to your phone's memory if desired, see Data Logging in the Settings menu.
d. Counts Tone
Each beep represents a detected count. You can disable this in the Settings menu.
e. Alarm
Your phone and detector can be set to alarm when detecting a higher radiation level than the alarm threshold. The alarm is disabled by default. Users can enable the alarm and set their own thresholds in the settings menu.
f. Disconnecting
Press the "Disconnect" button on the bottom of the page to disconnect from your detector. Make sure you also turn off the external detector by long pressing the button.
g. Exit app
Exit the app by opening the navigation drawer (top left three line icon, or swipe in from left side of screen) and clicking the Close option. This will disconnect the detector and exit the app
2. Storing External Detectors in Memory
Storing detectors in GammaGuard allows only your detectors to display while scanning. This prevents other detectors or Bluetooth Low Energy devices in general from appearing in the display and will make it easier to locate your detectors. GammaGuard can store up to four detectors in the memory.
a. Adding Stored Detectors
i. Open the external detector Settings and enable Display All Bluetooth Devices.
ii. Open External Detector in order to start a detector scan.
iii. Connect to the detector you wish to store.
iv. Disconnect and repeat to store up to four total detectors.
v. Return to Settings and disable Display All Bluetooth Devices.
b. Removing or Changing Stored Detectors
i. Open the external detector Settings, then go to Stored Detectors.
ii. You will see the MAC addresses of the four stored detectors.
iii. Click on the one you want removed, clear out the address, then press OK.
iv. The next time you connect to a new detector, it will be stored in place of the removed one.
3. Authentication
Some actions in GammaGuard require user authentication. This prevents calibration factors from being changed accidentally or by unauthorized users. When this happens, you will be prompted to enter your password. After entering your password, your authentication status will be stored until GammaGuard is closed.
The default GammaGuard password is ‘1234’. This can be changed from the settings menu.
4. Alarms
GammaGuard has two ways of notifying the user when the radiation levels are over pre-set thresholds.
a. Alarm
The primary alarm in GammaGuard will trigger a notification when it’s dose rate threshold has been exceeded. This will play an alarm siren (as long as the volume on your phone isn’t turned down), add an icon to the top of the screen, and leave a message in the notification drawer. This can be configured with the Alarm and Alarm Level settings.
b. Warning Level
As a visual cue, the top panel of GammaGuard will change color as the radiation levels rise. At a low radiation level, the panel will be green. As levels rise it will change to yellow, and then to red. The threshold levels for these changes can be configured with the Yellow Warning Level and Red Warning Level settings.
5. App Screens
a. Home Screen
This is the screen you will see when first opening GammaGuard. From here you can go directly to either the camera detector or external detector. You can also sign in and out of RadResponder in order to have your data logged to your RadResponder account. To navigate through GammaGuard, you can open the navigation drawer by either clicking the three line icon on the top left, or by swiping in from the left of the screen
b. External Detector
The external detector interface starts off at a detector scan. From here you can connect to a detector by clicking on it. Once connected, you will be taken to the data views. There are three data views, in order to see your data in different ways. You can change between these views by either swiping left and right, or by clicking on the tab of the view you want to see. You can disconnect from any of these data view by pressing the “Disconnect” button. This will take you back to the detector scan.
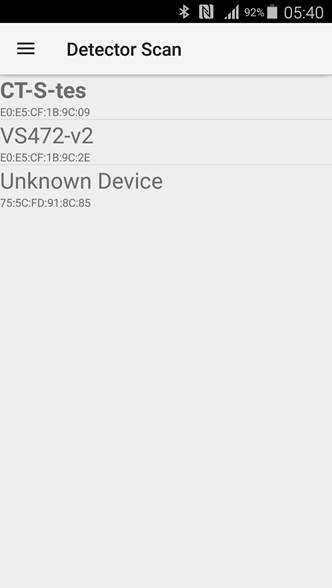
i. Detector Scan
Here you can view detectors in range of your phone. Click on a detector to connect to it. Stored detectors will have their name displayed in bold. Connecting to a detector not previously will store it in one of the four slots if available.
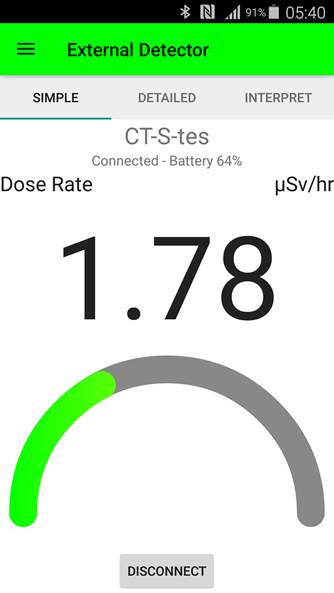
ii. External Detector Simple View
Here the dose rate (or another unit, chosen in the settings menu) is displayed, large enough to be easily read at a distance. This view also features an analog dial to provide an easy visual indicator.
iii. External Detector Detailed View
This view gives the most detailed information. It shows the live counts as they come in, dose rate, total dose, and the total accumulated counts and frames.

iv. External Detector Interpret View
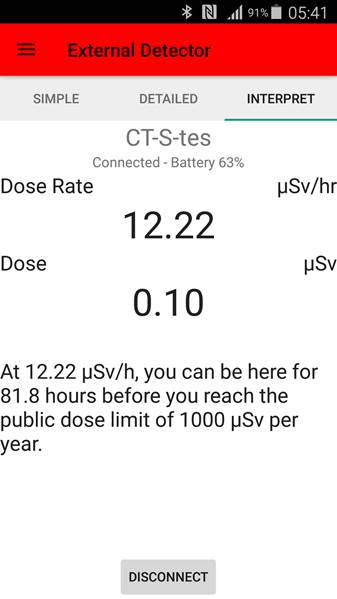
This view interprets your current dose rate. Letting you know how many hours you can stay there before exceeding a limit.
6. Settings
The settings can be accessed at any time through the navigation drawer. The camera detector and the external detectors have separate settings. Make sure you select the settings specific to the external detector.
Once you enter the settings menu, you will be prompted for a password. If the correct password is entered, all settings are displayed. If the wrong password is entered or if the user hits "Cancel" only the settings that do not require authentication are displayed.
a. Sound
Toggle this setting to enable/disable beeps to notify when a count is detected.
b. Alarm
Toggle this setting to enable/disable alarm warnings.
c. Alarm Level
This is the Dose rate level to be exceeded before an alarm is sounded. The alarm will sound even when the app is in the background.
d. Display Units
This changes the primary unit that doses and dose rates are displayed in.
e. Detector Buzzer
When enabled, the detector itself will beep when the dose rate exceeds the Alarm threshold
f. Data Logging
When enabled, dose data is periodically logged to a file on the phone, as well as to RadResponder if you are currently logged in.
g. Logging Interval
This is the interval (in seconds) at which data is logged.
h. RadResponder Event ID
This is the ID of the event from your RadResponder account that your data will be logged to. This will be set when you log on to your RadResponder account, but can also be manually changed here.
i. Yellow Warning Level
This sets the dose rate level at which the title bar will turn from green to yellow when a radiation measurement is in progress.
j. Red Warning Level
This sets the dose rate level at which the title bar will turn from yellow to red when a radiation measurement is in progress.
k. Display All Bluetooth Devices
When set all available bluetooth devices will be displayed when scanning, instead of just stored detectors (necessary to store new detectors)
l. Stored Detectors
These are the addresses of your stored detectors. They appear in Bold when scanned. Delete the address to remove a stored detector.
m. Background Mode
When enabled, this allows GammaGuard to run in the background so that radiation data can constantly be monitored. When disabled, GammaGuard will automatically close when it is interrupted (e.g. by receiving a phone call or another alert).
n. Conversion Factor
(Secure setting) This is the number of µSv that corresponds to 1 count, multiplied by 10^7. This value should be set as appropriate for different detectors. For example, if exposure to 1 µSv results in 2700 counts, the conversion factor is: 1 µSv/2700 counts x 10^7 = 3704
o. Password
(Secure setting) This changes the password that you must enter to become authenticated.
7. Updating GammaGuard
We recommend checking periodically to make sure you have the latest version of GammaGuard. You can always find the latest version of Gammaguard at: http://www.gammawatch.com/Download.html
It is important that you do not uninstall your current version of GammaGuard before installing the newest version. Uninstallation will result in losing your calibration and settings data. Always install the new version as an update.
a. Installation/Update Instructions
i. In your devices settings, find and enable the option to install apps from unknown sources. This will likely be under the category of Security or Applications.
ii. Click the link above to download GammaGuard to your device.
iii. You may be prompted with a security warning. If so, click OK to download the file.
iv. If you have previously installed GammaGuard and are downloading this as an update, you may be prompted that the file already exists. If so, click replace file.
v. When the file has finished downloading, click the download complete notification. Alternatively, using a 'downloads' or 'file explorer' app, find and click on the APK file.
vi. An automatic installer/updater will be launched.
vii. Clicking install will then complete the install/update process.
8. FAQ
a. Why does GammaGuard close when I open a notification/open phone settings/otherwise leave the app?
By default GammaGuard is set to not run in the background, and will therefore close itself down as soon as it the phone begins to run other Apps.. This mode is useful for short tests or times when GammaGuard is the only app being used on the phone. For longer tests, or when you want to make sure GammaGuard continues running until explicitly closed, we recommend turning on Background Mode in the settings.
b. Why is my measure button greyed out and not available when in Camera Detector mode?
This means the phone you are using has not yet had its camera noise removed. Please see the Removing Camera Noise section to learn how to remove noise and calibrate the phone.
c. Why am getting an unexpectedly high dose rate measurement when not near a radiation source when in Camera Detector mode?
You may have light getting to your phone's back camera. Make sure that it is covered completely so that no light can get in. If necessary, add several layers of black electrical tape over the lens. Otherwise, your phone may need to be re-calibrated or have a higher threshold set. See the Removing Camera Noise section for more information on this.